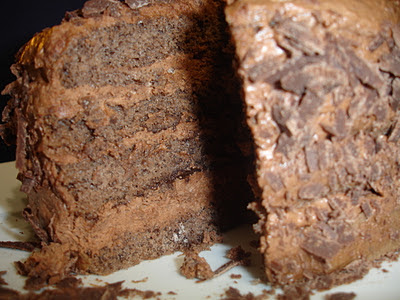
Today I made a mini Chocolate Mousse Layer cake that is simple to make, relatively quick and super chocolatey provided you dont have a 2 year old running around the kitchen and doing everything that you do.
The cake's sponge layers are moist but not too tender. You need some structure (like a genoise) so that it can hold up the mousse filling and not dissolve into a soggy mess. This cake is chocolatey but not overly rich or too sweet. It employs quality dark chocolate and tastes somewhat like a soft truffle. Next time I would probably use my swiss roll recipes for the cake layer and top it with chocolate mousse.
I used two 6-inch round pans to bake the cake layers. Then I used parchement paper folded 1/2 inch broader in circle than the cake and taped it so it will look like a ring mould. I just did not want to get fancy gadgets for just one time use.
Ingredients
Sponge Cake Layers (makes two 6-inch layers)
60 g unbleached all-purpose flour
15 g cocoa powder [I used dark, dutch-processed]
75 g sugar
4 large eggs, room temperature
1 tsp melted unsalted butter
Cocoa Syrup
75 mL water
10 g cocoa powder
10 g sugar
Chocolate Mousse Filling
150 g dark chocolate, chopped
300 mL whipping cream, cold
30 mL confectioners sugar
5 mL pure vanilla extract
8 g powdered gelatine
30-45 mL water to bloom the gelatine
Decoration
dark chocolate shavings or chocolate curls
Special Equipment
2 6-inch/15.24 cm round cake pans [I used Wilton], lined with parchment circles and sprayed with Pam or Baking Spray
1 adjustable ring mold, or a 7 inch/17.78 cm metal springform pan, optional or use parchement paper folded into a ring
Method
- Sift the flour and cocoa powder together in a bowl
- Preheat oven to 350 degrees. Have oven racks set in the middle.
- In a a small custard cup, soak the gelatine with the water until soft. Place in microwave and “zap” it for 10 seconds. Remove and stir until dissolved. Continue to heat for a few seconds at a time until the gelatine is clear and not lumpy anymore. You may need to add a few teaspoons of water to help this if you cannot get rid of the lumps.
- Prepare in a small saucepan, the cocoa syrup. Heat the sugar, cocoa powder and water until the sugar dissolves. Stir well and allow to cool.
Sponge Layer
- Beat the eggs in a stand mixer with a whisk attachment until foamy. Add the sugar and continue beating until pale and thick.
- Sift the flour and cocoa powder into the egg mixture. Fold gently from the bottom up to avoid deflating the bubbles. Add melted butter and fold well.
- Equally distribute the batter between the two 6-inch cake pans. Bake in a preheated 180°C/356°F oven for 15-20 minutes. The cake will pull away slightly from the edges of the pan when you bring it out.
- Turn the cake out while still hot. Leave it to cool on a rack.
Chocolate Mousse Filling
- In a double-boiler, melt the chocolate, stirring occasionally until smooth. Add the bloomed gelatine to the melted chocolate and continue to stir over the heat until it is combined well with the chocolate. Allow to cool
- In a stand mixer with the whisk attachment, pour in the cold whipping cream, confectioner’s sugar and vanilla and whisk until soft peaks form.
- Take a portion of the whipped cream with a hand whisk and lighten the chocolate mixture in a small bowl. Then, pour the chocolate mixture into the bowl of whipped cream and fold with the whisk until combined. Do not overmix. Just gently incorporate until no white streaks appear.
ASSEMBLY
- Split one sponge cake layer for this recipe. Wrap the other one for another recipe or use both the cake.
- Lightly brush the Cocoa Syrup on the split layers.
- On your serving platter or parchment-lined sheet pan, set the adjustable ring mold at 7 inches. Centre one layer of the sponge cake in the middle, leaving a 1cm perimeter around the cake layer. Pour half the chocolate mousse filling over the cake layer. Use a small metal spatula to gently coax the filling around the perimeter of the cake so as to touch the sides of the mold. You can gently tap the mold, holding it firmly down while doing so, to ensure that you do not get air pockets.
- Gently place the second cake layer on the mousse filling and ensure it is in the centre of the mold. Pour the rest of the mousse filling over this cake layer ensuring that the mousse doesn’t leave air pockets around the perimeter of the cake layers. Smooth the top. Refrigerate until set.
- To serve: Remove the ring mold carefully using either a hot towel or hair dryer to heat the sides of the ring mold until the mousse is able to loosen easily from the mold. Release the mold and carefully remove. If you find little bumps on the sides, heat your small metal spatula in hot water, wipe bone-dry and use the heat of the spatula to smooth the bumps. You can do this all around the edge of the cake to ensure a finished appearance. This isn’t so important if you intend to decorate with chocolate shavings or curls. Press the chocolate shavings into the sides of the cake and sprinkle generously over the top.


No comments:
Post a Comment