Sunday, October 30, 2011

Spooky Witches Fingers


Happy Halloween to all !

I was looking for something as an accompaniment for our pasta dinner tonight and came across this spooky breadstick recipe.  Although this time around I did not make my own bread dough but my children had a great time making this halloween fingers. My fingers are little puffy though...lol. Probably next time will roll it a little smaller.

Ingredients


Frozen  bread dough
1/4 cup melted butter
Parmesan cheese
garlic salt
egg yolks, beaten
food coloring
Almonds
small paintbrush

Method


  • Roll each roll into a 7-9 inch pointed rope.
  • Define finger nail on pointed end and knuckles and lines along the finger with a sharp knife. Place on a sprayed baking sheet and pinch finger thinner on both sides of knuckle.
  • Brush finger with butter avoiding fingernail. Sprinkle cheese and garlic salt on finger but not on nail.
  • Make nail color by combining egg yolk and food coloring to achieve desired color.
  • Paint nail with small paintbrush. Bake at 350°F 10-15 minutes.


Saturday, October 29, 2011

Baja Fish Taco


The first time I had fish taco's was at Colorado last summer. It was soooo good and since then I used to make the fish by using the frozen breaded fish for the taco but not till I stumbled upon this wonderful blog that I was motivated to make my own beer battered fish.  Whoa...what am I saying "beer", yes, I used beer and tempura flour for the batter.  My family loved it.  You could never tell that liquor was used as there was no after taste.  

Pairing this taco is a white sauce, avocado salsa and some shredded lettuce.  Thats all you need for a wonderful dinner that is packed with spice, crunch and creaminess. Dont be dreaded when you see the long list of items...the result is worthwhile.

Source: Average Betty

Ingredients

1 pound whitefish cut into 2 inch pieces ( I used Cod)

Avocado Relish

1/2 cup diced tomato
1/4 cup diced jalapeno
1 tbsp chopped cilantro
1/4 cup diced onion
1/2 cup diced avocado
fresh lime
salt, pepper

White Sauce

1 1/2 tbsp plain yogurt
1 1/2 tbsp mayonnaise
fresh lime
dash hot sauce

Beer Batter

3/4 cup beer 
3/4 cup flour
1/2 tsp salt
( Instead of regular flour, if you have tempura flour, use that)

Garnish

1 cup finely shredded lettuce ( I got the prepacked lettuce)
8 corn tortillas ( I used flour tortilla)
your favorite hot sauce
fresh lime wedges

Make the Avocado Relish:

In a bowl combine tomato, jalapeno, cilantro, onion, avocado, fresh lime, black pepper and salt. Stir together. Set aside.

Make the White Sauce:

In another bowl combine yogurt, mayonnaise, a dash of hot sauce and a squeeze of lime. Stir together until smooth. Set aside.


In a third bowl combine flour, salt and your favorite beer (or sparkling water if you don’t care to use beer). Stir together until smooth. Batter will have the consistency of thickish pancake batter. Add fish pieces to flour mixture. Coat thoroughly. Heat canola oil in a tall-sided heavy pot/pan over medium-high heat. Slowly add battered fish to oil and fry 3-6 minutes total. Remove from oil and drain on a paper towel. Sprinkle with sea salt.

On a warmed tortilla, spread the yogurt mixture. Add a few pieces of fish. Top with a sprinkling of lettuce. Serve with lime and avocado relish. Squeeze lime over cabbage and top with avocado relish.


Thursday, October 27, 2011

Muruku / Chakli


Now, these guys are the show stopper..no one celebrates Diwali without these. One particular savory cookie prepared for Diwali in our house by my mom used to be Murukku. It is a dough made of rice flour,urad dhal; mixed with sesame seed and cumin, ghee and salt.  Pressed out in a mould and fried. We love it so much and it finishes so fast that my mother did and stored these in huge air tight containers. Absolute bliss! I miss sitting around, having my mom prepare those as and when I craved for it. Times have changed - Now I am the one preparing this as and when my family craves for it.  Though it takes time and patience, this is one thing that I make every year for my family and each time I make this, it brings back memories of how me and my mother would hang out in kitchen while she makes it. I miss my mother so much and hope that my kids will hold on to tradition and someday make it for their family.

Ingredients

3 cups rice flour (sifted well - also make sure there aren't any stones/debris etc)
1 cup Urad dal flour ( pan fry without oil and grind in dry grinder)
2 tsp. melted butter
1 tsp cumin
1 tsp sesame seed, toasted
Salt to taste ( it varies from family to family - apprx. 1/2 tsp to 1 tsp or as per taste)


Method
  • Mix all the ingredients in a bowl.
  • Adding water little by little, form a stiff dough.
  • Now there are two ways to go about making these Murukku using the Murukku maker ( yes you need this to make  murukku ) Among different attachment that you get for this maker - you will find 1 star and 3 stars plates. 
  • Take the 1 star attachment and fix it to the maker. Alternatively take a damp clean cloth and lay it on the counter. Or use plastic sheet lightly brushed with oil/butter. Take a small amount of dough and place it inside the maker - the one which has narrow hole in it
  • Now place the other mould which is used to press the dough through the hole on top.
  • Press the dough on the plastic sheet and you will find the dough coming out shaped as per the one star attachment. Slightly rotate the maker round and round until you make a circle.
  • You can make as many spirals as you please.
  • Just remember that you would have to remove it from the plastic to your hands and then drop it into the hot oil.
  • With practice it gets easier to retain the shape of the circle while dropping into the oil.
  • You can completely skip the plastic/cloth for this attachment and if you are comfortable enough, just press the dough right on top of the oil. Press it until a sufficient amount has dropped into the oil and break off the rest of the dough from dropping - just stop pressing the maker.
  • Now fry them until done - You can make it red, light brown or golden as per preference.
  • Drain them on paper towels. Let them cool and store in air tight containers. 
Muruku mould..


Tuesday, October 25, 2011

Ghee / Suji Cookies


This is my first time trying to make this cookies.  As the name says it...these babies are made only with ghee. Ghee is a clarified butter and easily can be bought at the Indian Grocery store. It is easy to make your own ghee but in this case I would prefer just buying one. The special thing about this cookie is that it melts in ones mouth !! You could say its something like Melting Moments. Its not made with suji (semolina) but I don’t know why many refer it as Suji Cookies.


Ingredients


Ghee - 1/2 cup
Icing Sugar - 1/2 cup
Baking powder- 1/4 tsp
Plain flour - 1 1/4 cup
Salt a pinch


Method

  • Preheat oven to 350 degrees. Line as many baking trays as you have with aluminum foil and set aside.
  • In a mixing bowl, add flour, baking powder, sugar, salt and finally the ghee. ( Do not add all at once). Mix into a soft dough by adding more ghee.
  • With slightly moistened hands, shape 1/4 teaspoonfuls of dough into little balls. Place them about 1 inch apart on prepared baking sheets. Bake a tray at a time for about 10 or so  minutes, rotating halfway through. The biscuits should have an ivory tinge and still be a little soft when you take them out of the oven- they will firm up as they cool.


I was getting sleepy..my cherries are not evenly cut !

The bottom should not be brown at all.  

Monday, October 24, 2011

Coconut Cookies


Another favorite of mine for this festive season is Coconut Cookies.  These lightly toasted coconut which is in the dough brings in the flavor when you put it in your mouth.

Ingredients

250gm butter
2 1/2 cup flour
1/2 cup cornstarch
1/4 tsp salt
125gm desicated coconut (lightly toasted)
1 egg yolk
1/2 cup sugar
vanilla essence
Cherries (I did not have any on hand)


Method

  • Lightly beat butter and sugar.  Add egg yolk, salt and vanilla.  Mix well.
  • Add flour and cornstarch. ( Do not add all flour at once, sometimes the dough will be slightly thick depending on humidity). Lastly add the toasted coconut.
  • Roll the dough and use cookie cutter. Top with cherries.
  • Bake at 350 degrees for about 15 to 20 minutes.

Sunday, October 23, 2011

Dahlia Cookies


This cookie can be seen at mostly all houses during festive season. Takes some time pressing it out of the molds but its really delicious with a very mild sugar and melt in your mouth texture.   Ingredients used are minimum. I used a Dahlia cookie mold but I suppose this can be pressed by any cookie cutter. Yet to try that.  This cookie can be dressed by putting some cherries cut into small pieces or sugar sprinkles.

Ingredients

225gm butter, room temperature
110gm confectioner sugar
1 yolk
1/2 tsp vanilla
70gm cornstarch
120gm custard flour
170gm all purpose flour
1/4 tsp salt
cherries for ganishing


Method
  • Beat butter and sugar ( I used wooden spoon to mix the butter and sugar) Add egg yolk, salt and vanilla. Mix well.
  • Sift in the all purpose flour, custard flour and cornstarch. 
  • Put in the cookie mold and press out onto a cookie sheet. ( Add more flour if dough appears to be very soft.) Top with small pieces of cut cherries.
  • Bake at 325 degrees for about 15 minutes.


Saturday, October 22, 2011

London Almond Cookies


Some has almond nibs and some with melted white chocolate

Today I made another cookie for my festival next week.  This one has almond inside the cookie and coated with chocolate.

Ingredients

125g butter, diced
75g icing sugar, sifted
1 egg yolk
225g plain flour, sifted
1 tsp rice flour
300g whole toasted almonds with skin, halved
450g dark chocolate, melted
Small paper cases
Almond nips or chocolate rice for decoration


Method

  • Cream butter and sugar until light and creamy ( I just used wooden spoon)  Beat in the egg yolk. 
  • Add plain flour and rice flour. Fold and mix well.
  • Take a marble-sized dough (approximately 8-10g) and wrap around half the almond. Shape into a small egg. Place on greased cookie trays and bake in preheated oven at 350 degrees for 20-25 minutes. Cool on wire racks.
  • Place cooled cookies on small paper cases. Top and cover with melted chocolate.
  • Sprinkle almond nips or chocolate rice liberally over the top.


Friday, October 21, 2011

Pineapple Tart


Anticipating festivals can sometimes be more fun than the festivals themselves.  Deepavali or better known Festival of Lights is an important festival in Hinduism, celebrated for different reasons, occurring between mid-October and mid-November. For Hindus, Diwali is one of the most important festivals of the year and is celebrated in families by performing traditional activities together in their homes, visiting friends and family.

These past couple of days I have been tied down making cookies for the festival which is round the corner.  Today I would like to share something that I have been making since I was a teenager.  Its sort of a pastry filled with pineapple filling. Not one year goes by without me making this.

Ingredients


2 1/2 cups  all-purpose flour
2 sticks butter orn225 grams butter
1/4 teaspoon salt
1 egg yolk
4 tablespoons confectioners’ sugar/icing sugar
2 tablespoons cornstarch (corn flour)
1 egg yolk (lightly beaten for egg wash)

For the pineapple filling

2 cans (20 oz can) sliced pineapples
10 tablespoons sugar (more or less to taste)
1 teaspoon cornstarch or corn flour (mixed with 1 teaspoon water)

Method

Drain the pineapple slices and then squeeze the extra water/juice with your hands. Blend the canned pineapples until it’s mushy, about 10 seconds.

Pineapple Mould (Nastar)

Put the filling in and roll
Using medium heat, cook the pineapple and sugar until most liquid has evaporated, and the filling turned golden. Stirring constantly using a wooden spoon to avoid burning. Taste, and add more sugar when needed. Add in the cornstarch (corn flour) to thicken the filling. Let it cool in the fridge.

For the Pastry

Sieve the flour, cornstarch, salt and sugar into a medium bowl. Soften the butter to room temperature. Add in the egg yolk and the flour. Knead to form the dough.

Divide the dough and pineapple filling each into 24 equal rounds. Use a pineapple mould to make long thin strips and put in the rolled filling and roll the pastry up.
You can also use a pineapple tarts mould to make the pattern above.

Preheat the oven for 350F and bake for 20-25 minutes or until light brown.


Tuesday, October 18, 2011

Black Magic Cupcake


Halloween is the second best holiday that we look forward every year.  My kids love to dress up for their Halloween party at school.  This year I decided to make some cupcakes for my husband's work place. This cupcake is super moist and its almost like making it from the box mix.  I topped it with some homemade whipped buttercream frosting.

What makes it even more special is that there is not many bowl and beater to wash..yay.  Just mix the liquids in a bowl and the dry ingredients in another and then pour together, whisk whisk.  Try it and this will surely be a go to cupcake mix.


Source:  Hersheys

Ingredients


2 cups sugar
1 3/4 cups all-purpose flour
3/4 cup unsweetened cocoa powder
2 teaspoons baking soda
1 teaspoon baking powder
1 teaspoon salt
2 eggs
1 cup buttermilk
1 cup strong black coffee or 2 tbsp of instant expresso powder mix with 1 cup of hot water
1/2 cup vegetable oil
1 teaspoon vanilla extract

Buttercream Frosting

3 cups confectioners’ sugar
1/2 cup butter, room temperature
1/2 cup vegetable shortening
1/2 teaspoon vanilla extract and 1/2 tsp almond extract
1 to 2 tablespoons whipping cream


Method

  • Adjust oven rack to lower-middle position and preheat to 350 degrees F. Line muffin pan with baking cup liners.
  • In the bowl stir together sugar, flour, cocoa, baking soda, baking powder and salt. In another bowl add  lightly beaten eggs, buttermilk, coffee, oil and vanilla; whisk till everything is combined. Batter will be thin. Transfer batter to a glass measuring cup with a pour spout and pour batter evenly into prepared pans.
  • Bake at 350 degrees for 20 minutes or until wooden pick inserted in center comes out clean. Remove cupcakes from pan. Cool the cupcakes in pan for 10 minutes. Remove from the pan and let cool completely on a cooling rack.
  • To make butter cream frosting, In a stand mixer fitted with the whisk attachment, mix together sugar, shortening and butter. Mix on low speed until well blended and then increase speed to medium and beat for another 3 minutes.
  • Add vanilla, almond and cream and continue to beat on medium speed for 1 minute more.
  • Decorate however you want.  I used a wilton decorating tip.


Monday, October 17, 2011

Kuih Bangkit


I remember my mother in law making this for chinese new year but I just craved for this and tried making it on my own.  Kuih Bangkit is a traditional Chinese New Year cookies and it is made mainly from tapioca flour, eggs and coconut milk. It is a cookie that is hard on the outside but melts in your mouth. This is one cookie that has quite a long shelf life compared to other cookies like Pineapple Tarts. It can be kept for about 2 months if stored in airtight container.  Trying using good quality coconut milk.

Ingredients

2 1/2 cups tapioca flour/tapioca starch
1 Tbp. butter, melted
1 egg yolk (from large egg)
1 cup icing sugar
120ml thick coconut milk (or coconut cream)

Bangkit mould

Method


  • Place a paper towel on a microwave safed bowl, add the tapioca flour and microwave for 1 minute. Set aside and let it cool. (You can fry the flour in the wok if you don't have a microwave.) 
  • Microwave extra tapioca flour for standby (to flour the surface) and kneading purposes.
  • Sift tapioca flour and icing sugar in a big bowl. Add melted butter, yolk & coconut milk. Knead until the dough is pliable. (If the dough is wet or soft, add more tapioca flour, 1 Tbp. at a time and knead until it becomes a harder dough. Likewise, if it's too dry, add more coconut milk).
  • Roll out the dough on lightly floured surface to about 3mm thickness. Cut into shapes with a cookie cutter (Or you can use the kuih bangkit mould (this required longer baked time). Arrange on lined baking tray and bake at 350'F for 15 minutes. It will puff when baked.


Friday, October 14, 2011

Pumpkin Expresso Ice Cream


This ice cream, without a doubt, is one of the best ice creams I’ve ever made.  It’s super creamy and full of all the flavors you’d expect to find in a pumpkin spice latte.  I love how the espresso and pumpkin both stand out and how the fall spices add subtle background flavors to the ice cream.  You might think that the ice cream would be slightly gritty because of the amount of espresso and spices, but I can assure you it’s not.  If you like pumpkin spice lattes, you will love this ice cream.


Ingredients

2 cups heavy cream
1 1/2 cups half and half or whole milk
2 tablespoons instant espresso powder
1 1/4 teaspoons ground cinnamon
1/2 teaspoon ground nutmeg
1/4 teaspoon ground ginger
1/8 teaspoon ground cloves
4 egg yolks
3/4 cup granulated sugar
1 cup pumpkin purée

Makes about 1 1/2 qt


Method

  • In a medium saucepan over medium heat, whisk together the heavy cream, half and half, espresso powder and spices and bring to a simmer. Meanwhile, using a hand mixer on medium speed, beat the egg yolks and granulated sugar together until the mixture becomes light in color and falls from the beaters in ribbons.
  • Remove one cup of liquid from the cream mixture and gradually pour into the egg yolk mixture, beating the entire time, to temper the eggs. Add tempered egg mixture back to the saucepan and whisk well. Add the pumpkin purée and continue to whisk until the mixture is smooth. Reduce heat to medium-low and continue cooking until the custard has thickened and coats the back of a wooden spoon.
  • Transfer the custard to a large mixing bowl, preferably one with a pour spout, and cover with plastic wrap, pressing the plastic wrap against the surface of the custard. Chill for at least two hours, or overnight. Freeze the custard in an ice cream maker according to manufacturer’s directions. Once the ice cream has reached soft serve consistency, transfer to an airtight container and freeze for 3-4 hours, or until ice cream has hardened. To make the ice cream easily scoopable, allow it to sit at room temperature a few minutes before serving.

Wednesday, October 12, 2011

Green Tea 'Matcha' Ice Cream


I had some leftover green tea powder and was thinking of ways to use it up when I thought how an ice cream would taste like with green tea.  It has a unique taste to it unlike other regulars which we always have. I just added a hint of vodka to keep the ice cream smooth and some chopped pecan for bite which is totally optional.

Source: The Perfect Scoop by David Lebovitz


Ingredients

1 cup whole milk
¾ cup sugar
Pinch of salt
2 cups heavy cream
4 tsp. matcha (green tea powder)
5 eggs


Method

Combine the milk, sugar and salt in a medium saucepan.  Heat over medium heat until warmed through.  Meanwhile pour the heavy cream into a large bowl and whisk in the matcha.  Set a fine mesh sieve over the bowl.
In a separate medium bowl, whisk the egg yolks until smooth.  Whisking constantly, slowly pour the warmed milk mixture into the bowl with the egg yolks.  Return the entire mixture to the saucepan and continue to cook, stirring constantly and scraping the bottom of the pan, until the mixture thickens slightly, you can check this by making a line at the back of the spoon and if the lines remain separated then its done.   Immediately remove from the heat and pour the mixture through the mesh strainer into the bowl with the cream mixture.  Whisk the mixture vigorously to dissolve the green tea powder.  Cover and chill in the refrigerator.

Once the mixture is thoroughly chilled, transfer it to an ice cream maker and freeze according to the manufacturer’s instructions.


Tuesday, October 11, 2011

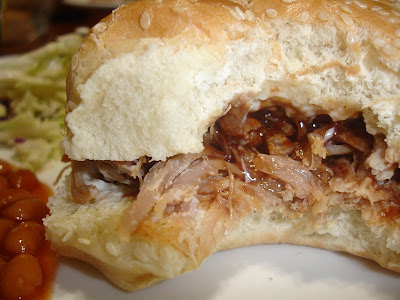
Pulled Pork


I have tried pulled pork many times but this recipe has such intense flavor that is hard to describe.  When I measured the amounts stated, I was thinking to myself chili powder and cumin on a pork.  This ought to be good and brining it before cooking is something new to me. It actually helped to keep the meat moist and develop the flavors.  For what is worth, this is truly a wonderful recipe. Thanks to one of my favorite blogger who posted this amazing pulled pork dish.

Source:  Sweet Pea's Kitchen

Ingredients

I halved the amount below since I only used 1 1/2lb of meat. Followed all the instruction given except that I put it in a slow cooker on High for 6 hours instead of roasting it.


For the Rub

1 tablespoon ground cumin
1 tablespoon garlic powder
1 tablespoon onion powder
1 tablespoon chili powder
1 tablespoon cayenne pepper
1 tablespoon salt
1 tablespoon ground pepper
1 tablespoon paprika
1/2 cup brown sugar

Brine Solution

4 pound bone-in pork shoulder roast 
2 quarts cold water
1/2 cup salt
1/2 cup brown sugar
3 tablespoons dry rub mix
bay leaves

Method to Prepare the Roast

  • Rinse the pork shoulder and place in a large container, pour in the brine solution until the shoulder is completely covered. 
  • Cover the container and place in the refrigerator for at least 8 hours. Then remove pork shoulder from brine solution, pat dry with paper towels, place in baking pan that is bigger than the shoulder by at least a inch in length and width and at least 3 inches deep. 
  • Sprinkle dry rub onto the surface of the shoulder and massage in such that it adheres to the surface. Coat all sides. Make sure the fat layer on the shoulder is facing up before cooking! Place baking pan uncovered in a 225 degree oven on the middle rack. 
  • Insert a probe thermometer into the center or thickest part of the shoulder, but not touching the bone. Monitor the temperature throughout cooking (a digital thermometer with an alarm function is the easiest way to do this). Do not remove from the oven until the center of the shoulder reaches 200 degrees. 
  • When the shoulder has reached 200 degrees, shut off the oven and let the roast cool for a couple of hours before removing from the oven. If the bottom of the pan is dry (or crusted with dried spices) then cover the pan with foil to retain internal moisture of the meat during the cooling period. 
  • When the temperature drops to 170 degrees or slightly lower, remove from oven. Place on a large, clean work surface such as a cutting board, and remove the large sheet of crusted fat on the top. Pull apart with two forks, it will pull apart very easily.

Sunday, October 9, 2011

Light Chocolate Pot De Creme


I know, the name sounds really big but ‘Pot de Crème’ [poe duh krem] is simply a fancy shmancy French way of saying pot of custard and believe me this is a super easy dessert.  It is velvety smooth, light and fluffy and best of all, its individual dessert that you can enjoy just for yourself.  I especially loved it because it has my favorite, chocolate. The ingredients are super easy to put together and the Pot de Creme can be made ahead of time infact it needs to be in the fridge for at least 2 hours before serving so that it can set up and can be kept for over 24 hours.

Source: Moms Kitchen Handbook


Ingredients

3 ounces bittersweet chocolate
1 cup low-fat milk
½ cup heavy cream
¼ cup sugar
2 egg yolks
1 whole egg
1 teaspoon vanilla extract

Method

  • Preheat oven to 325°F. Arrange six 4-ounce heatproof ramekins in a deep baking dish.
  • Shave, grate or finely chop the chocolate and put it in a medium bowl.
  • Combine the milk, cream and sugar in a small saucepan and cook over medium-high heat until the sugar dissolves and bubbles form around the edge of the pan. Pour milk over the chocolate and stir with a whisk until the chocolate is completely melted and smooth. Allow it to cool for a few minutes until it is warm, not hot, to the touch.
  • Gently whisk the egg yolks, egg and vanilla in a small bowl until blended. Add the eggs to the chocolate and whisk until smooth. Put the chocolate into a pitcher or large glass measuring cup and pour it into the 6 ramekins. Fill the baking pan with enough very hot tap water to reach halfway up the sides of the ramekins.
  • Bake until the edges of the chocolate are firm and the center moves a little when jiggled, 15 to 20 minutes. Avoid touching the top of the cremes because they won’t be quite so pretty.
  • Take the baking pan out of the oven and remove the cups from the pan. Allow them to cool on the counter for an hour.
  • Cover with plastic wrap and refrigerate at least 2 hours before serving..


Friday, October 7, 2011

Chocolate Rum And Raisin Ice Cream


Yum yum yum..thats all I can say for now.  You definitely have to try this. I guess making your own ice cream somehow makes it extra special.  The rum used here makes this chocolate ice cream extra tastier  and I absolutely love the raisins.  This time I did not use a low fat milk but instead mixed it with some whole milk so that its a little creamier but of course you can make it with low fat milk without worrying about compromising the taste.

Source:  Redneck Waitakere

Ingredients

1½ cup low fat milk
15g cocoa powder
100-120g sugar
2 large eggs
pinch salt
1 cup whipping cream or heavy cream

2 Tbsp rum
25g  cocolate, roughly chopped or raisins

(If using raisin, I just soak the raisin with 1 tbsp rum just before adding them in)

Method
  • Pour milk, sugar and cocoa into a saucepan. Heat on medium-low to a simmer point (do not allow to simmer).
  • In another container whisk the eggs. Gently whisk the hot milk into the egg mixture to temper it.
  • Return the entire mixture, half the cream, and salt into the saucepan and heat on medium-low heat until custard consistency stirring all the time (5-10 minutes). Run a finger down the center of the spoon, and if a line remains separating the two custard halves, then your custard is thick enough and done. 
  • Remove custard from the heat. Lightly whip the remaining cream and add to the custard. This helps to cool the custard and prevents it from cooking further.
  • Add the alcohol. Stir well to combine. Strain for a smoother ice cream (optional).
  • Cover the top of the mix with a clingwrap to prevent a skin from forming.
  • Refrigerate overnight to let the flavor develop.
  • Churn in ice cream machine and add some of the choc chunks or raisins. Spoon mixture into an airtight container, sprinkle the rest of chopped chocolate on top. Freeze for several hours.
  • Leave at room temperature for 5-10 minutes before serving.


Wednesday, October 5, 2011

Green Goddess Rice with Broiled Trout


I came across this recipe as I was watching Food Network. Its basically something like pesto.  After reading the mixed review, I thought of making it since I had some avocados in the fridge.  It was pretty good. Slight tang from the lemon juice and creaminess from the avocado.  I served it with broiled trout fillets.

Ingredients

1 1/2 cups Basmati rice
Salt
1 small avocado, peeled, pitted, and coarsely chopped
1/2 cup packed fresh basil leaves
1 lemon, juiced
3 tablespoons extra-virgin olive oil
1/4 cup water
Freshly ground black pepper

Method

  • Bring the rice, 3 cups water, and a pinch of salt to a boil in a medium saucepan over medium heat. Reduce the heat to a gentle simmer, stir, cover, and cook until water is completely absorbed, 15 to 18 minutes. Remove from heat and let stand, covered, for 10 minutes.
  • Meanwhile, put the avocado, basil, lemon juice, oil, and 1/4 cup water in the jar of a blender and puree; season generously with salt and pepper. Add more water and puree until the mixture is the consistency of sour cream.
  • Fluff the rice with a fork and gently fold the green dressing into the warm rice. Taste and add more salt and pepper, if necessary. Serve immediately.

Broiled Trout Fillets

1 lb steelhead trout fillet, with or without skin
1 clove garlic, chopped fine
1 1/2 tablespoons coarsely chopped fresh rosemary
1 lemon, zest of
1/2 lemon, juice of
1/4 teaspoon salt
1/2 teaspoon fresh ground pepper
1 tablespoon olive oil, plus
additional oil, for greasing baking pan

Method
  • Prepare a baking or roasting pan by lining it with foil and brushing it with olive oil.
  • Preheat broiler.
  • Mix together all remaining ingredients except fish into a well-blended paste.
  • Place fish skin-side down (if it has skin) on baking sheet, then spread seasoning over flesh.
  • Broil fish at second rack away from heat for 5 minutes or less, just enough to sear flesh but not burn herbs.
  • Lower fish to 3rd or 4th rack and lower oven heat to 325°F Bake for 10 additional minutes, or until fish is cooked through in the thickest portion.
When I bought this, I almost thought it was salmon when the fish monger told me its trout.